How can I customize the Welcome Window Widget?
The Welcome Window Widget causes popup content to be delivered when students first access the course homepage.
The Welcome Window Widget's default settings require the module containing this content to have the word "welcome" in the module title. You may want to change this default behavior if you'd prefer a different word would trigger the popup on the course homepage.
Configuration Options
Options can be configured to adjust elements like colors, intro text (default: Visit Course Content to get started.), button text (default: Launch the Welcome Module), trigger word text (default: Welcome) and more.
To customize these options, click the … button on the widget and then click the Reset button. This will load most of the configuration variables into the Widget Config text box.
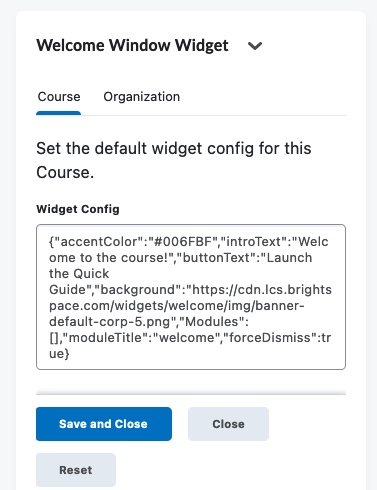
When changing the configuration variables be careful to ONLY edit the variable values. Keep all the punctuation, brackets and other elements unchanged. If a mistake is made, you can always click the Reset button again to replace the current contents with the default text. Note the moduleTitle and forceDismiss configuration settings are not loaded with the Reset button. These must be added manually.
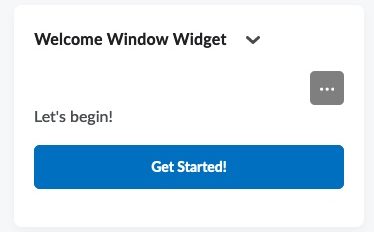
In the image below, I have customized the Welcome Window Widget to display new welcome text (e.g. "Let's begin!"), with updated button text (e.g. "Get Started!"). I also changed the trigger word the widget from “welcome” to “started.” And forceDismiss is set to true so that students must click all the way through all the pages. In other words, there is no close (x) button for them to exit the content early. Note: instructors will still see the close (x) button.
 Here is that same code you can paste into the Widget Config if you want to recreate these settings.
 - {"accentColor":"#006FBF","introText":"Welcome to the course!","buttonText":"Launch the Quick Guide","background":"","Modules":[],"moduleTitle":"started","forceDismiss":true}
With these changes, the widget loads my Getting Started! module content. And the widget itself appears as shown in the image below with the new text.
Related Articles
How can I remove a widget from my homepage?
In order to remove widgets, you must first be set up and using a custom homepage. If you are not sure if you have a custom homepage, see How do I edit my homepage? Removing a widget from a custom homepage Click on Course Admin > Homepages Click on ...How can I create a custom widget to put on my course homepage?
You can create custom widgets for the course homepage under Course Admin > Widgets. Click the blue Create Widget button at the top of the Widgets page Give the widget a name. The name will appear to students by default. The description is optional. ...How do I add a widget to my homepage?
You will need to edit your custom homepage in order to add/remove/relocate widgets. How do I edit my homepage? If you want to add a custom widget with content of your own, see How can I create a custom widget to put on my course homepage? How to Add ...How do students see their similarity score?
If you are using Turnitin on assignments in your course, consider adding the Turnitin widget to your course homepage. This will provide student awareness of the tool, access to resources, as well as easy access to the Assignments list page in their ...How do I edit my homepage?
You can only edit custom homepages. So step 1 is to create a custom homepage, or at least figure out if you have a custom homepage already. Talon courses are initially created with a system shared homepage layouts that you cannot change directly. Do ...